Arduino pH Meter with PH-4502C: Wiring, Calibration & Code Guide
Reading time: 6 minutes
Last modified:
pH measures how acidic or alkaline a solution is on a 0–14 scale, with 7 as neutral. For Arduino projects — aquarium monitors, hydroponic controllers, soil testers, wastewater loggers — the PH-4502C is the most widely available analog pH interface module, costing $10–20 and connecting directly to any Arduino analog input.
This guide covers: module specs, calibration, wiring, and three Arduino sketches of increasing sophistication.
PH-4502C Module Specifications
The PH-4502C accepts a BNC-connector glass electrode probe and outputs a 0–5V analog voltage proportional to measured pH.
| Parameter | Value |
|---|---|
| Supply voltage | 5V DC |
| Power consumption | ≈0.5W |
| Measuring range | pH 0–14 |
| Operating temperature | 0–60°C |
| Accuracy | ±0.1 pH |
| Response time | ≤60 seconds |
| Probe connector | BNC |
| Analog output (PO) | 0–5V |
| Temperature output (TO) | Analog |
| Board dimensions | 43mm × 32mm |
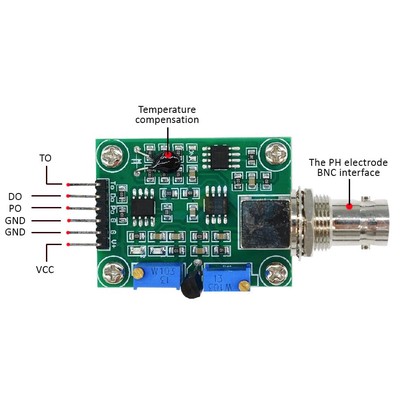
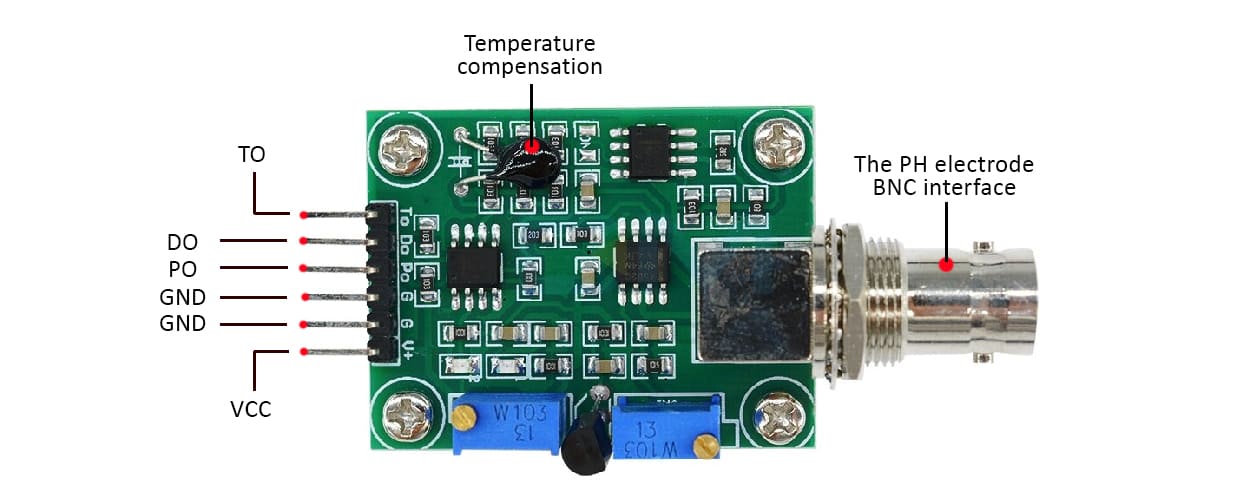
PH Probe Sensor Pinout
- TO — Temperature output (analog, for software compensation)
- DO — Digital output: goes HIGH when pH crosses the threshold set by POT2
- PO — Analog pH voltage output → connect to Arduino A0
- Gnd — Ground for pH probe
- Gnd — Ground for board (connect both GND pins)
- VCC — 5V DC power
- POT 1 — Offset trimmer (nearest to BNC connector) — sets midpoint voltage for pH 7
- POT 2 — Limit trimmer — sets the pH threshold for the DO digital trigger
How pH Measurement Works
The BNC glass electrode contains a thin glass membrane separating an internal reference solution from the measured sample. Hydrogen ions (H⁺) in the sample create a potential difference across the membrane proportional to ion concentration — the Nernst equation in practice.
At pH 7 (neutral) the electrode potential is zero. At pH 4 (acidic) it goes positive; at pH 10 (alkaline) it goes negative. The PH-4502C module shifts and scales this signal so pH 7 corresponds to 2.5V at the Arduino analog input:
pH = 7 + ((2.5 − V) / 0.18)
The constant 0.18 is the expected voltage change per pH unit (electrode slope). Well-maintained glass electrodes produce 0.177–0.185 V/pH at 25°C.
Calibration
Calibration sets the offset so pH 7 reads exactly 2.5V at PO. This is a one-time setup — the module’s gain is fixed.
What you need: pH 7.0 buffer solution, multimeter, small Phillips screwdriver.
- Disconnect the BNC probe and short-circuit the BNC connector (touch centre pin to shield with a wire).
- Power the circuit (Arduino 5V → VCC, both GNDs connected).
- Measure voltage at the PO pin with a multimeter.
- Adjust POT 1 (trimmer nearest to the BNC connector) until PO reads 2.500V exactly.
- Reconnect the probe. Rinse with distilled water, immerse in pH 7.0 buffer solution.
- Serial Monitor should now show values between 6.8 and 7.2. Fine-tune POT 1 in small increments if needed.
Tip: Always rinse with distilled water between measurements and buffer solutions. Never wipe the glass bulb — the glass membrane scratches easily and degrades quickly.
Wiring Diagram
PH-4502C PO  → Arduino A0
PH-4502C GND → Arduino GND  (connect both GND pins)
PH-4502C VCC → Arduino 5V
Sketch 1: Basic pH Reading
#include <Arduino.h>

int pHSense = A0;
int samples = 10;
float adc_resolution = 1024.0;

void setup() {
    Serial.begin(9600);
    delay(100);
    Serial.println("CimpleO pH Sense");
}

float ph(float voltage) {
    return 7 + ((2.5 - voltage) / 0.18);
}

void loop() {
    int measurings = 0;
    for (int i = 0; i < samples; i++) {
        measurings += analogRead(pHSense);
        delay(10);
    }
    float voltage = 5.0 / adc_resolution * measurings / samples;
    Serial.print("pH= ");
    Serial.println(ph(voltage));
    delay(3000);
}
Sketch 2: Moving Average Filter
Glass electrode output carries electrical noise. Collecting 30 samples over 3 seconds and discarding the highest and lowest 5 before averaging significantly improves stability:
#include <Arduino.h>

#define SAMPLES 30
#define TRIM    5

int pHSense = A0;

float ph(float voltage) {
    return 7.0 + ((2.5 - voltage) / 0.18);
}

float readPH() {
    int buf[SAMPLES];
    for (int i = 0; i < SAMPLES; i++) {
        buf[i] = analogRead(pHSense);
        delay(30);
    }
    // sort ascending
    for (int i = 0; i < SAMPLES - 1; i++)
        for (int j = i + 1; j < SAMPLES; j++)
            if (buf[i] > buf[j]) { int t = buf[i]; buf[i] = buf[j]; buf[j] = t; }
    // average middle values
    long sum = 0;
    for (int i = TRIM; i < SAMPLES - TRIM; i++) sum += buf[i];
    float voltage = 5.0 / 1024.0 * sum / (SAMPLES - 2 * TRIM);
    return ph(voltage);
}

void setup() { Serial.begin(9600); }

void loop() {
    Serial.print("pH= ");
    Serial.println(readPH(), 2);
    delay(1000);
}
Sketch 3: Temperature Compensation
pH readings shift approximately 0.003 units per °C away from neutral. At pH 4 in a 35°C environment, uncompensated error reaches ±0.03 pH. Connect the TO pin to Arduino A1 for temperature-corrected readings:
#include <Arduino.h>

int pHSense  = A0;
int tempSense = A1;

float ph(float voltage) {
    return 7.0 + ((2.5 - voltage) / 0.18);
}

float readTemperature() {
    int raw = analogRead(tempSense);
    return raw * 5.0 / 1024.0 * 100.0; // 10mV/°C linear sensor
}

void loop() {
    int raw = 0;
    for (int i = 0; i < 10; i++) { raw += analogRead(pHSense); delay(10); }
    float voltage = 5.0 / 1024.0 * raw / 10.0;
    float rawPH   = ph(voltage);
    float temp    = readTemperature();
    float compPH  = rawPH + (temp - 25.0) * 0.03;

    Serial.print("Temp: "); Serial.print(temp, 1);
    Serial.print("°C  pH= ");  Serial.println(compPH, 2);
    delay(3000);
}
PH-4502C vs Alternative pH Modules
| Module | Price | Interface | Temp. compensation | Accuracy | Best for |
|---|---|---|---|---|---|
| PH-4502C | $10–20 | Analog 0–5V | Manual (TO pin) | ±0.1 pH | Prototyping, hobby, monitoring |
| DFRobot Gravity pH | $30–50 | Analog | Manual | ±0.1 pH | Same principle, cleaner form factor |
| Atlas Scientific EZO-pH | $140–160 | I2C / UART | Built-in | ±0.001 pH | Production devices, lab accuracy |
| SEN0161 | $25–40 | Analog | Manual | ±0.1 pH | Alternative to PH-4502C |
For Arduino prototypes, the PH-4502C provides sufficient accuracy at minimal cost. When moving to a production device — especially where readings drive automated dosing or safety alerts — the Atlas Scientific EZO-pH’s precision and I2C interface justify the higher price.
If you’re working with IoT hardware, you might also find our JRD-100 UHF RFID module guide useful, or learn how to stream sensor data in real time with Kafka. For cellular connectivity in field-deployed sensors, see our A9G GSM/GPS module guide.
Building a connected device that needs to move beyond a prototype? CimpleO’s IoT engineering team covers the full stack — from firmware and PCB design to cloud backend and mobile dashboard. If you’re scaling pH monitoring across greenhouses, hydroponic farms, or field sensor networks, see our agritech software development work. Get in touch to discuss your project.
Frequently Asked Questions
Can the PH-4502C be used in saltwater or hydroponic solutions?
Yes. The BNC glass electrode measures hydrogen ion concentration regardless of other dissolved substances. For saltwater applications, rinse the probe with distilled water after each use to extend electrode life.
How often does the PH-4502C need recalibration?
For general monitoring, recalibrate every 2–4 weeks. In high-temperature or harsh environments, calibrate weekly. Store the probe tip in KCl storage solution or pH 4.0 buffer between uses to slow electrode drift.
What is the difference between PH-4502C and Atlas Scientific EZO-pH?
The PH-4502C costs $10–20 and outputs a raw analog voltage requiring manual calibration. The Atlas Scientific EZO-pH costs around $150 and communicates over I2C/UART with built-in temperature compensation. For prototyping, PH-4502C is sufficient. For production devices or lab-grade accuracy, Atlas Scientific is the better choice.
Why are my pH readings unstable or fluctuating?
Common causes: the glass bulb is not fully submerged; electrical noise on the analog line (add a 10µF capacitor between A0 and GND); incorrect offset calibration (redo with a shorted BNC); or a dry electrode (store the probe tip in storage solution, never let it dry out).
Does the PH-4502C support temperature compensation?
The module has a temperature output (TO pin) but does not apply compensation internally. pH readings shift approximately 0.003 units per °C away from neutral. For precision, read the TO pin with a second analog input and apply software compensation as shown in Sketch 3 below.
Can I use the PH-4502C with a 3.3V Arduino or ESP32?
The module requires a 5V supply and its analog output spans 0–5V, which exceeds the 3.3V ADC reference of ESP32 and Arduino Due. Add a 2:1 voltage divider (two 10kΩ resistors) on the PO line for 3.3V systems. Powering the module from 3.3V will produce incorrect readings.